Showing posts with label Sharepoint. Show all posts

Sunday, 27 March 2016

What is SharePoint Provider Hosted App/Add-in?

SharePoint provider-hosted add-ins includes components that are deployed and hosted outside the SharePoint farm. They are installed to the host web, but their remote components are hosted on another server.

SharePoint-hosted add-ins has a fixed hosting pattern, since they are hosted on the add-in web. Provider-hosted add-ins provides more flexibility for hosting the various components of your add-in, so if you choose to create one, you’ll need to match your goals and requirements to the appropriate hosting pattern. One of the most important questions you need to ask when considering provider-hosted add-ins and how you’ll build them is how the add-in will get authorization to interact with SharePoint.

Provider-hosted add-ins gives you two choices:
  1. JavaScript cross-domain library
  2.  OAuth

1. JavaScript cross-domain library:

The cross-domain library lets you interact with more than one domain from the remote components of your add-in through a proxy. If client-side code and the permissions of a user who is signed in to SharePoint are sufficient, the cross-domain library is a good option. The cross-domain library is also convenient whenever you are making remote calls through a firewall.

2. OAuth:

OAuth is an open protocol that enables secure authorization from client applications (desktop, web, and mobile applications) in an easily manageable way. If you plan to build a SharePoint Add-in that runs in a remote web application and communicates back to SharePoint 2013, you will often need to use OAuth. OAuth is required whenever you are calling into SharePoint from a remotely hosted web application that can’t use client-side code (HTML + JavaScript) exclusively.

If you are using Provider-hosted add-in with Azure (Cloud) web deployment and Office 365 then you need Microsoft Azure Access Control Service (ACS) as the trust broker between Azure (Cloud) Web and Office 365 SharePoint site to make it authorize. But if you are deploying add-in in On-premises SharePoint 2013 site then it needs Server certificates along with ACS to enable High-Trust between add-in and SharePoint. These certificates will be installed on SharePoint on-premises server to enables trust between add-in and SharePoint.

The following table lists all of the possible patterns for hosting both the SharePoint components and the remote components of your add-in, along with the trust brokers that are available to you if you’re using OAuth:

SharePoint component location
Remote component location
Trust broker
On premises
In cloud
ACS, certificate
On premises
On premises
ACS, certificate
Office 365 SharePoint site
In cloud
ACS
Office 365 SharePoint site
On premises
ACS


References:

Wednesday, 23 March 2016

Replace an expiring client secret in a SharePoint Add-in (Provider Hosted App)

If you register the app on the Seller Dashboardyou can set the expiration as long as 3 years. In the dashboard, you can also add new secrets when the old ones approach their expiration date. The new secret will be enabled in all instances of the app. But if you register the app with AppRegNew.aspxthe secret expires in 1 year

In order to replace/renew the client secret we need to follow below steps:
  1. Prerequisites for refreshing a client secret 
  2. Find out the expiration dates of the SharePoint Add-ins installed to the Office 365 tenancy 
  3. Generate a new secret 
  4. Update the remote web application in Visual Studio to use the new secret

1. Prerequisites for refreshing a client secret

Ensure that you have the following things installed on your local development server/computer:
  • Microsoft Online Services Sign-In Assistant is installed on the development computer.
  • Microsoft Online Services PowerShell Module (32-bit; 64-bit) is installed on the development computer.
  • You are a tenant administrator for the Office 365 tenant (or a farm administrator on the farm) where the add-in was registered with the AppRegNew.aspx page.

2. Find out the expiration dates of the SharePoint Add-ins installed to the Office 365 tenancy

  • Open Windows Powershell or SharePoint 2013 Management Shell  and run the below mentioned command:Connect-MsolService    
  • Once you run the above cmdlet a login prompt will appear, enter tenant-administrator (or farm administrator) credentials for the Office 365 tenancy or farm where the add-in was registered with AppRegNew.aspx.
  • To generate a list of all registered add-ins, run the below mentioned cmdlet:
    $applist = Get-MsolServicePrincipal -all  |Where-Object -FilterScript { ($_.DisplayName -notlike "*Microsoft*") -and ($_.DisplayName -notlike "autohost*") -and  ($_.ServicePrincipalNames -notlike "*localhost*") }
    
    foreach ($appentry in $applist)
    {
        $principalId = $appentry.AppPrincipalId
        $principalName = $appentry.DisplayName
        
        Get-MsolServicePrincipalCredential -AppPrincipalId $principalId -ReturnKeyValues $false | Where-Object { ($_.Type -ne "Other") -and ($_.Type -ne "Asymmetric") }
        
         $date = get-date
         Write-Host "$principalName;$principalId;$appentry.KeyId;$appentry.type;$date;$appentry.Usage"
    
    }  > c:\temp\appsec.txt
  • Now, open the file C:\temp\appsec.txt to see the report. Leave the Windows PowerShell window open for the next procedure, if any of the secrets is near to expiration

3. Generate a new secret

  • Create a client ID variable with the following line (Please mention the Client ID whose Client secret is about to expire)
    $clientId = 'client id of the add-in'
    
  •  Generate a new Client ID with the following line:
    $bytes = New-Object Byte[] 32
    $rand = [System.Security.Cryptography.RandomNumberGenerator]::Create()
    $rand.GetBytes($bytes)
    $rand.Dispose()
    $newClientSecret = [System.Convert]::ToBase64String($bytes)
    New-MsolServicePrincipalCredential -AppPrincipalId $clientId -Type Symmetric -Usage Sign -Value $newClientSecret
    New-MsolServicePrincipalCredential -AppPrincipalId $clientId -Type Symmetric -Usage Verify -Value $newClientSecret
    New-MsolServicePrincipalCredential -AppPrincipalId $clientId -Type Password -Usage Verify -Value $newClientSecret
    $newClientSecret
  • The new client secret will appear on the Windows PowerShell console. Copy it to a text file. You use it in the next procedure.

4. Update the remote web application in Visual Studio to use the new secret

Open the SharePoint Add-in project in Visual Studio, and open the web.config file for the web application project. In the appSettings section, there are keys for the client ID and client secret. Update the Client ID, Client Secret and add Secondary Client Secret as mentioned below:

<appSettings>
  <add key="ClientId" value="your client id here" />
  <add key="ClientSecret" value="your new secret here" />
  <add key="SecondaryClientSecret" value="your old secret here" />
     ... other settings may be here ...
</appSettings>

Now Republish the web application.

It's done :)

Tuesday, 22 March 2016

"Permissions Request XML" to grant permissions at different levels to App Step

Please find the below mentioned Request XML to grant permission at different level based on the requirement:

User profile (If you want permission to User Profiles):
<AppPermissionRequests>
    <AppPermissionRequest Scope="http://sharepoint/social/tenant" Right="Read" />
  </AppPermissionRequests>

Permission at all site collections (If you want permission on all site collections within the Tenant):
  <AppPermissionRequests>
    <AppPermissionRequest Scope="http://sharepoint/content/tenant" Right="Read" />
  </AppPermissionRequests>

Full permission at site collection (If you want permission at Site collection):
<AppPermissionRequests> 
  <AppPermissionRequest Scope="http://sharepoint/content/sitecollection" Right="FullControl" /> 
</AppPermissionRequests>

Full permission at sub site (If you want permission at Sub-Site under Site collection):
<AppPermissionRequests> 
  <AppPermissionRequest Scope="http://sharepoint/content/sitecollection/web" Right="FullControl" /> 

</AppPermissionRequests>


Note: 
  1. Copy paste the above given XML as it is. Do not replace "Scope" value.
  2. Replace the "Rights" value with your required role: Read, FullControl, Contribute, etc.,

Tuesday, 15 March 2016

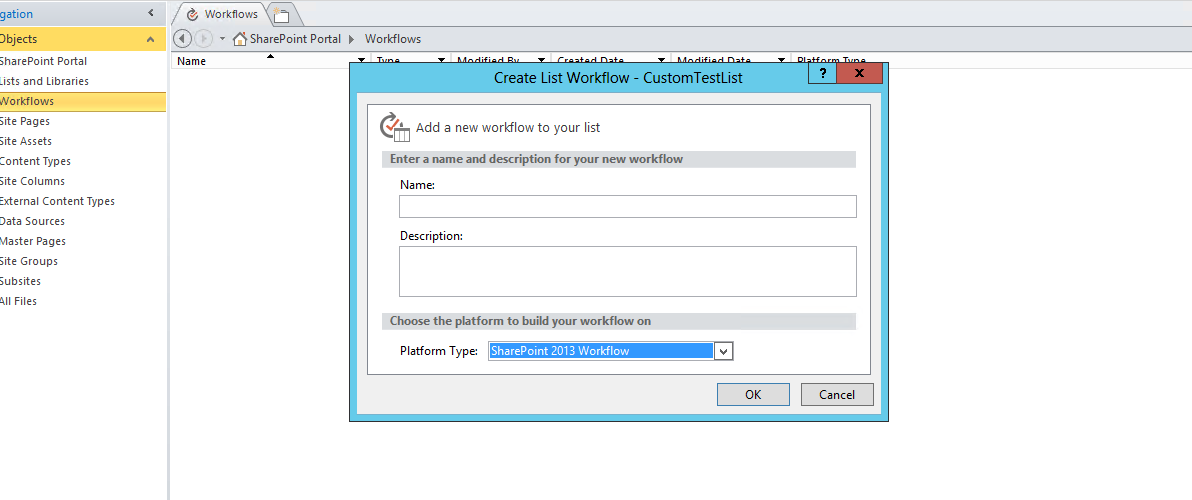
SharePoint 2013 workflow template is not enabled in SharePoint 2013 deisgner

First, we have to install and configure Workflow Manager for SharePoint 2013 Farm. Click here to Install and configure the Workflow configuration wizard based as required.

Second, We have to run below mentioned Powershell command in SharePoint 2013 Management Shell:

SyntaxRegister-SPWorkflowService –SPSite –WorkflowHostUri -ScopeName [-PartitionMode] [-AllowOAuthHttp] [-Force]

Example
1. Without SSL
Register-SPWorkflowService –SPSite "http://Mysharepoint2013" –WorkflowHostUri "http://Mysharepoint2013:12291" –AllowOAuthHttp -force

2. With SSL
Register-SPWorkflowService –SPSite "https://Mysharepoint2013" –WorkflowHostUri "https://Mysharepoint2013:12290" –AllowOAuthHttp -force


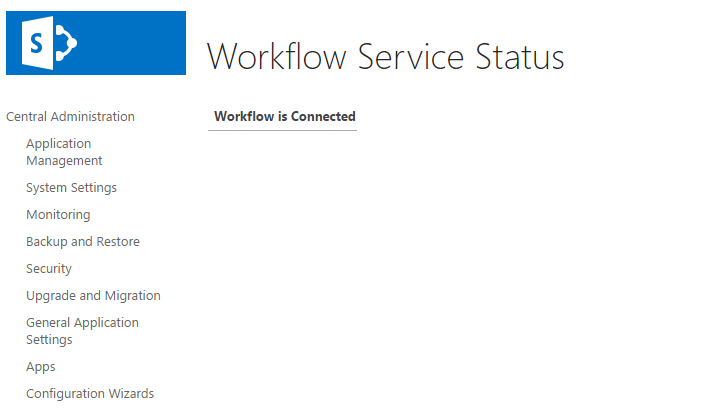
After running powershell command Go to Central Admin --> Application Management --> Manage Service Applications -->Workflow Service Applications


Now if you see "Workflow is connected" then close the designer and reopen the site in designer and check, "SharePoint 2013 Workflow" template will be available.


-Happy SharePoint

Tuesday, 8 March 2016

SharePoint Designer 2013: Unable to Edit the Workflow

When I was working with SharePoint 2013 designer workflow for Office 365 site, I was getting a blank screen when I tried to open designer workflow which was working fine in another system/machine. Then I came to know that this issue is related to SharePoint designer of particular version. After some research I found this hot fix which fixed my issue - https://support.microsoft.com/en-us/kb/2837633 .

Hope your issue solved.

Saturday, 20 September 2014

Sign in as different user menu is missing in SharePoint 2013

It’s been noted that the “Sign in as a Different User” menu command is missing in SharePoint 2013. This “Sign in as Different User” menu item is very useful when testing applications, but it can lead to some problems when opening documents. So, it may be for these reasons that the option has been removed in SharePoint 2013.

You can add the menu item back in, but I would suggest only doing this on test or development SharePoint servers.

To do this, please follow the below steps:

1.      Go to the file \15\TEMPLATE\CONTROLTEMPLATES\Welcome.ascx and open in a text editor.
2.      Add the following element before the existing element with the id of “ID_RequestAccess
           <SharePoint:MenuItemTemplate runat="server" ID="ID_LoginAsDifferentUser"
            Text="<%$Resources:wss,personalactions_loginasdifferentuser%>"  
            Description="<%$Resources:wss,personalactions_loginasdifferentuserdescription%>" 
            MenuGroupId="100"  Sequence="100"  UseShortId="true"
           />
 3.      Save the file.

Now, go to the menu and check. It shall be displaying.

Hope this helps.


Filter web parts are not displaying in Add Web part catalog

Reason:  Your server is not Enterprise version or you did not activate the features. If your server is enterprise version then directly follow the “Enable enterprise Features steps
If  your SharePoint server is not enterprise version then u will not be able to see filter webparts. This means your server is standard version, first update your server to Enterprise version and then you will find filter webparts.

Solution: (Requires Product key to activate to Enterprise version)

1.      Go to Central Administration
2.      Select “Upgrade and Migration” heading.
3.      In Update and Migration page select Enable Enterprise Feature.
4.      Now, select Enterprise option and enter the Product key to activate the feature.

Enable enterprise features

1.      Go to site collection where you want to use filter webparts
2.      Go to site settings
3.      Under Site Collection Administration select site collection features
4.      Activate “SharePoint server enterprise site collection feature” feature.
5.      Now go to the sub-site where you want to use webparts. Then go to Site settings
6.      Go to “Manage site features
7.      Activate "SharePoint server enterprise site feature" feature.
8.      Now go and check whether filter webparts are displaying or not. It will work.


Hope this helps.

New option is disabled in central administration -> manage web application. How to Enable it?

In order to enable “New” option in “Manage Web Application” tab, please go through the below steps:

1.     Go to Start.
2.     Type Central Administration.
3.    Select SharePoint Central Administration -> open (right click and select “Run As Administrator”)
4.    Now your browser shows all the options.

Reason: The browser is not run under administrator mode.

Hope this helps you.

Copy/Move SharePoint 2010 Designer Workflows

Most often, we require moving or copying SharePoint designer workflows from one site or site collection to another. There is an option in SharePoint Designer 2010, "Export to Visio" which exports your workflow as .vwi file, and can be imported in to another site using the option "Import from Visio".  But when you try that option, you will get the below message.

This workflow cannot be imported because it was created in SharePoint Designer for a different site, or the original workflow has been moved or deleted. To move a workflow between sites, use× Save as Template (.wsp file) instead of a Visio workflow drawing.

So, to achieve our goal (copy/move workflow) please follow the below mentioned steps : 

1.      In the source site (From where you want to copy WF), create the required workflow and publish it.

2.      Now select Export to Visio option which allows you to save the workflow with a .vwi extension. (Let’s refer this as source workflow).

3.      Now go to the destination site where you want the workflow to be copied, and create a new workflow with the same name as the previous one & publish it.

4.      Now select Export to Visio option which allows you to save the workflow with a .vwi extension. (Let’s refer this as destination workflow).

5.      Now you will be having two .vwi files (one of source workflow’s – SourceWorkflowName.vwi and other of the destination workflow’s – DestinationWorkflowName.vwi). Now add .zip extension to both the files. Now your files names should be SourceWorkflowName.vwi.zip & DestinationWorkflowName.vwi.zip.

6.      Now open both the zip files, copy workflow.xoml.wfconfig.xml from destination workflow to source workflow. (Its destination to source and not source to destination).

7.      From now on, we will not use the file DestinationWorkflowName.vwi.zip.  So ignore that file.

8.      Remove the .zip extension from SourceWorkflowName.vwi.zip which gives you the SourceWorkflowName.vwi file.

9.      Now, go to the destination site, open workflows and click Import from Visio and browse to the SourceWorkflowName.vwi file.

10.  That’s it and your workflow is copied. You can publish the workflow and run it.

NOTE: In case if your list’s GUID’s (for those lists that you have used in workflow – tasks list, history list or any other lists used in workflow steps) have been changed from source & destination site, you may need to update those steps in the workflow.

Hope this helps you.

Tuesday, 18 February 2014

Create Group in SharePoint 2010 Programmatically

To Create group in site collection level use the following command:

   string siteUrl = SPContext.Current.Web.Url;
   using (SPSite spsite = new SPSite(siteUrl))
   {
      using (SPWeb web = spsite.OpenWeb())
      {
          web.SiteGroups.Add("GroupName", web.CurrentUser, web.CurrentUser, "GroupDescription");
          web.Update();
      }
   }

To Create group in site level use the following command:

   string siteUrl = SPContext.Current.Web.Url;
   using (SPSite spsite = new SPSite(siteUrl))
   {
      using (SPWeb web = spsite.OpenWeb())
      {
          web.Groups.Add("GroupName", web.CurrentUser, web.CurrentUser, "GroupDescription");
          web.Update();
      }
   }

Friday, 15 November 2013

How to create Sharepoint List using Client Object Model (JavaScript) ?

To Create a SP List follow the below steps :

Step 1 : Add HTML TextBox and Button fields to HTML file as below.

          <h2>List Creation</h2>
          <table >
            <tr>
               <td>
                    List Name :
               </td>
               <td>
                   <input id="tbList" type="text" />
               </td>
            </tr>
            <tr>
               <td >
                   <input type="button" id="btnCreateList" value="Create List" onclick="CreateList()" />
               </td>
            </tr>
         </table>

Step 2 : Add below Script to create a SPList when you fill Textbox and click 'OK' button.

    <script type="text/javascript">
    var siteUrl = "/";  //give your site url. Ex: sitecollectionTitle/siteTitle
    function CreateList() {
        var listName = document.getElementById("tbList");
        var clientContext = new SP.ClientContext(siteUrl);
        var oWebsite = clientContext.get_web();
        var listCreationInfo = new SP.ListCreationInformation();
        listCreationInfo.set_title(listName.value);
        listCreationInfo.set_templateType(SP.ListTemplateType.genericList);
        var oList = oWebsite.get_lists().add(listCreationInfo);
        clientContext.load(oList);
        clientContext.executeQueryAsync(Function.createDelegate(this, this.onQuerySucceeded), Function.createDelegate(this, this.onQueryFailed));
    }
    function onQuerySucceeded() {
        alert('Request successfully completed');
    }
    function onQueryFailed(sender, args) {
        alert('Request failed. ' + args.get_message() + '\n' + args.get_stackTrace());
    }
   </script>


Step 3 :  Execute the above code.Enter the list name in the textbox and click button. Now the list gets created.

Enjoy Coding....


Wednesday, 23 October 2013

Difference between List Definition, List Template and List Instance in Sharepoint

List Definition:
A list definition defines a schema for a SharePoint list. It contains information on what views are being used, which columns and content types are being used, and other metadata information.
 
List Template:
A list template can either be created by end users through the SharePoint user interface using an existing list as a pattern or using an existing list instance. If based on a user-created list it is called a custom list template. A custom list template includes everything that defines the list, including list columns and site columns used by the list, content types used by the list, views defined for the list, and so on.
 
Tips
A list template may sound like a list definition but they are effectively the same thing, a pattern for a SharePoint list. They differ mainly in how they are created:
- A list templates are created in SharePoint or SharePoint designer.
- A list definitions in Visual Studio.

List Instance:
A list instance is an instance of a specific SharePoint list definition or list template. All of its data is stored in the relevant content database. Typically a list in SharePoint used by end users to enter and view data and it is based on either a list template or list definition.

Friday, 18 October 2013

Get user Email ID from a sharepoint people picker field / column of a list

The below code works fine to get an Email ID from people picker field for an Item of a list.

        string userEmailID = GetUserEmail(spListItem, "PeoplePickerfieldName");

        public string GetUserEmail(SPListItem spListItem, string fieldName)
        {
            SPFieldUser spFieldUser = (SPFieldUser)spListItem.Fields[fieldName];
            SPFieldUserValue spFieldUserValue = (SPFieldUserValue)spFieldUser.GetFieldValue(spListItem[fieldName].ToString());
            return spFieldUserValue.User.Email;
        }


Send Email from Sharepoint Event Receiver

There are two types of Event Receivers i.e., Before event receiver and After event receiver. Before event receivers will trigger before the create / insert / delete / update operations of a list / item /site / web . After event receivers will trigger after the create / insert / delete / update operation completed.

So, generally we send an Email to a concern person after the List or List item is inserted or deleted or updated. It means the Email should send from After event receiver.

Please find the below code to Send Email from Sharepoint Event Receiver :


       public override void ItemAdded(SPItemEventProperties properties)
       {
           try
           {
               MailMessage mail = new MailMessage();
               mail.From = new MailAddress("YourEmailID@gmail.com");
               mail.Bcc.Add("bccEmail@gmail.com");
               mail.CC.Add("sampleEmail@ymail.com");
               mail.To.Add("FriendEmailID@yahoo.com");
               mail.Subject = "Test Mail";
               mail.Body = "Hi...!!! This is a test mail.";
               mail.IsBodyHtml = true;
               SmtpClient smtpClient = new SmtpClient();
               smtpClient.Host = "smtp.gmail.com";
               smtpClient.Port = 587;
               smtpClient.UseDefaultCredentials = false;
               smtpClient.Credentials = new System.Net.NetworkCredential("YourEmailID@gmail.com", "YourPassword");
               smtpClient.EnableSsl = true;
               ServicePointManager.ServerCertificateValidationCallback = delegate
               {
                   return true;
               };
               smtpClient.Send(mail);
           }
           catch (Exception ex)
           {
                 //Your Exception code
           }
       }


The above code works fine to send an email from Event Receiver using SMTP server.

How to get list item url in Editmode or Displaymode in sharepoint 2010

Below given code works fine to get the list item url in Edit Form :

string listItemUrl = string.Format("{0}{1}?ID={2}", properties.WebUrl, splist.DefaultEditFormUrl, spListItem.ID);

In the above code:

  • properties.WebUrl gets the Current Web url. Ex: http://SharepointSite:8888.
  • splist.DefaultEditFormUrl gets the given list url. Ex/Lists/YourListName/EditForm.aspx. If your want to use display form then you can use splist.DefaultDisplayFormUrl instead of edit form.
  • spListItem.ID gets the list item ID to which you want to edit.

Below given code works fine to get the list item url in Display Form :

string listItemUrl = string.Format("{0}{1}?ID={2}", properties.WebUrl, splist.DefaultEditFormUrl, spListItem.ID);

Thursday, 17 October 2013

Error : The user does not exist or is not unique.

This error occurs due to one of the policy(feature) enabled in Windows Server 2008 by default. It is a local policy in 2008 R2 that is required to be disabled (and machine restart is required after reset). 
This policy name is "Domain member: Digitally encrypt or sign secure channel data (always)". It is Enabled by default when you configure Windows Server 2008 R2. 


Steps to reach the policy and disable it:


Step 1 : Start -> Run -> type gpedit.msc and press enter.
Step 2 : Browse to Computer Configuration -> Windows Settings -> Security Settings -> Local Policies -> Security Options

Step 3Under Security Options on the right hand side, you will find this policy. Double click to open the policy, Click 'Disable' radio option. Save the changes.
Step 4 : Restart the machine. 

Even after configuring above one if you find the same error then follow the below steps:


Step 1 :  Start -> Run -> type inetmgr and press enter.
Step 2 :  Go to Application Pools 
Step 3 : Select your application on the right hand side. Right-click on it and select Advance Settings.
Step 4 : Under Process Model heading -> select identity field and click on the button of the field to change it.
Step 5 : Select Built-in Account -> select NetworkServices . Press OK.

Now, your issue will be solved.

Saturday, 12 October 2013

How to Create Lookup field(dropdownlist) in sharepoint visual webpart and update its value into sharepoint list programmatically :

Here, in my code dropdownlist is a lookup field. The below code shows how to bind data to the dropdownlist and then shows how to save the data into sharepoint list Lookup field when an item is selected in dropdownlist.

Create dropdownlist in .ascx visual webpart as below:

<asp:DropDownList ID="dropdownlist" runat="server"></asp:DropDownList>

Now copy and paste below code in page load :


        string siteUrl = SPContext.Current.Web.Url;
        protected void Page_Load(object sender, EventArgs e)
        {
            if (!IsPostBack)
            {
                using (SPSite spsite = new SPSite(siteUrl))
                {
                    using (SPWeb spweb = spsite.OpenWeb())
                    {
                        SPList list= spweb.Lists["YourLookUpListName"];
                        SPListItemCollection items = list.GetItems();
                        dropdownlist.DataSource = items;
                        dropdownlist.DataTextField = "FieldName"; //List field holding name
                        dropdownlist.DataValueField = "FieldName"; //List field holding value
                        dropdownlist.DataBind();
                    }
                }
            }
        }

Now copy and paste below code in the button submit :


        protected void Submit_Click(object sender, EventArgs e)
        {
            using (SPSite spsite = new SPSite(siteUrl))
            {
                using (SPWeb spWeb = spsite.OpenWeb())
                {
                    SPList spList = spWeb.Lists["ListName"];
                    SPListItem spListItem = spList.Items.Add();
                    spListItem["LookUpFieldName"] = Convert.ToInt32(dropdownlist.SelectedItem.Value);
                    spListItem.Update();
                 }
             }
        }

The above code works fine for all the dropdown lookup fields in sharepoint visual webpart.


Total Pageviews